


One of the most fundamental ways to generate content on your website is to create a story. A story is very much like a news article, as you have a title, a "Story Brief" which can be thought of as the "byline" or summary, and the "Story Content" which is the main content of the story.
-
To begin, log in to your account through your club homepage, then click on Member Area on the top right-hand corner under your club banner. Alternatively, click here to go directly to the ClubRunner login page.
-
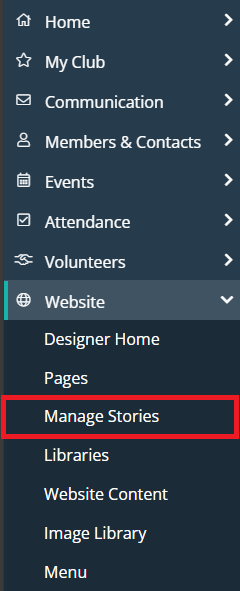
Click Website in the left-hand menu navigation, then click Manage Stories.
-
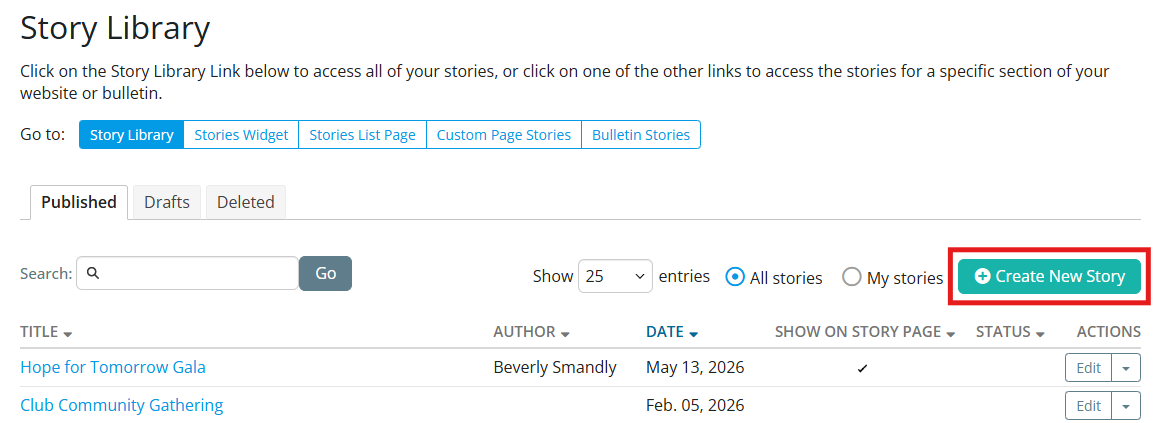
This will take you to the Story Library, where you can find and edit all the stories on the website. Click the Create New Story button to create a new story.
To learn more about the story library please read the article: How do I use the Story Library in Nova?
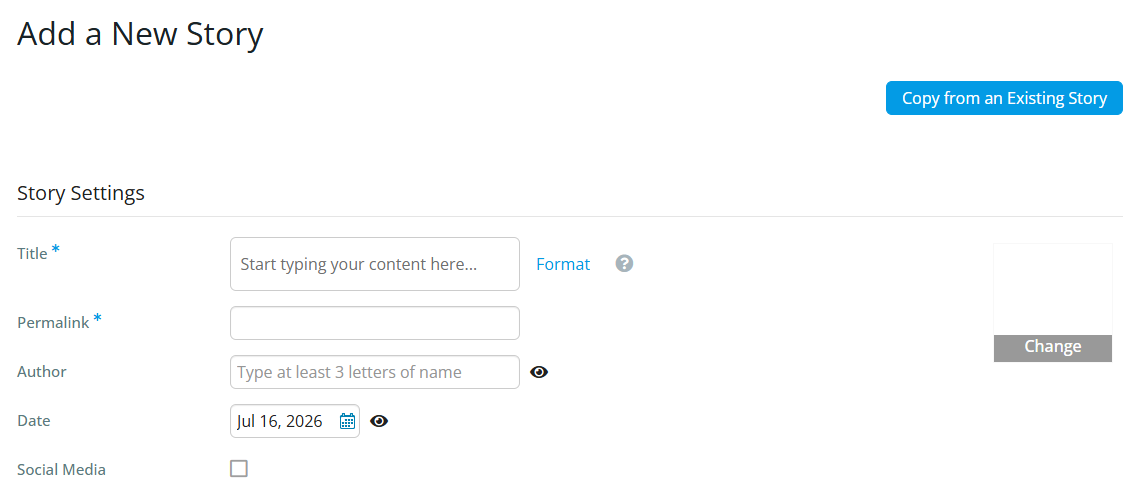
- You are now on the Create Story page. You will see the following options at the top of the page:
-
Copy from an Existing Story - This allows you to copy an existing story from the story library.
-
Title - This required field is for the title of your story.
-
Permalink - This is used as a URL link for the story being created.
-
Author - This field defines the writer of the story. The eye icon on the right-hand side allows you to select if you wish to display the author. If the eye is crossed out, it will not display the author.
-
Date - This field tells you when the story was written. The eye icon on the right-hand side allows you to select if you wish to display the date of the story. If the eye is crossed out, it will not display the author.
-
Social Media - This allows you to turn on the Social Media Share Bar. This bar allows a reader to share the story on social media, like Facebook, Twitter/X, and more.
-
Change (Thumbnail) - This allows you to add a thumbnail image which will display to the left-hand side of the story.
-
-
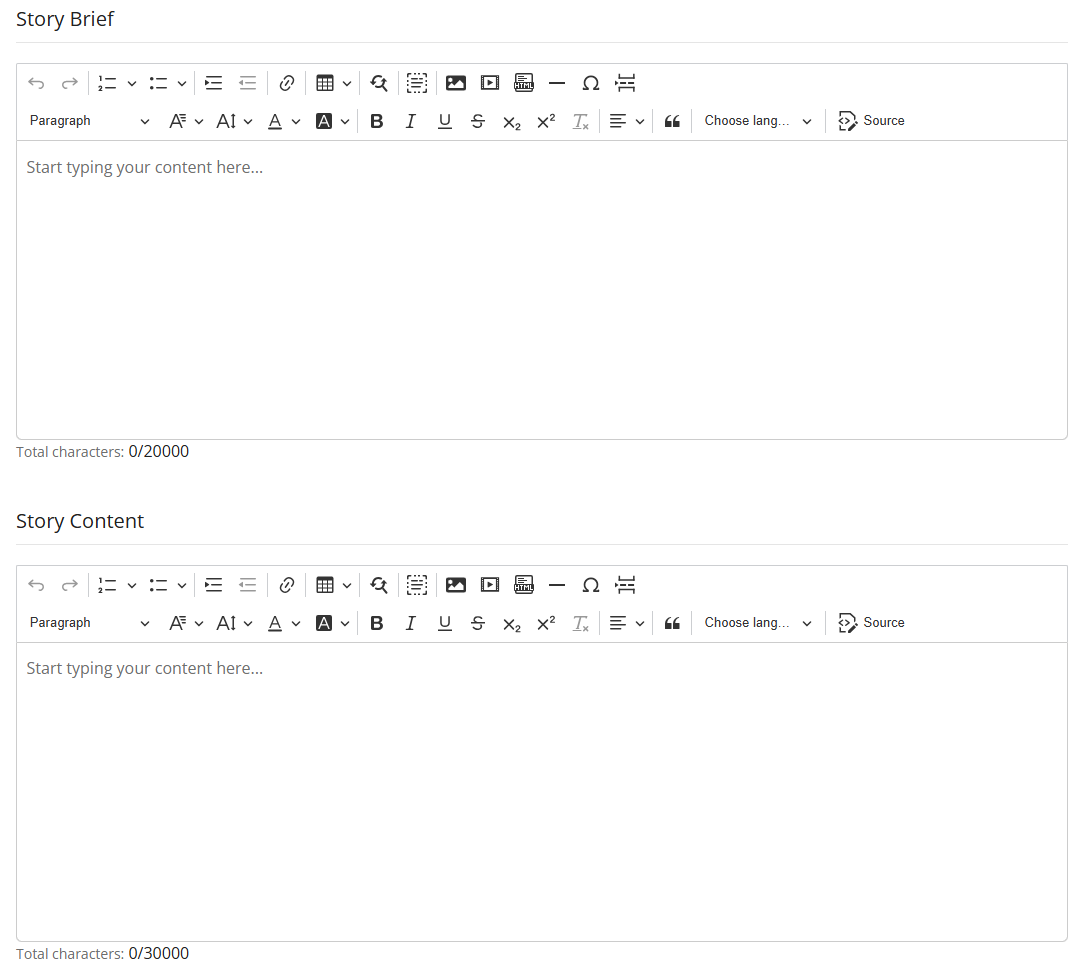
Below those options, there are two sections: Story Brief & Story Content.
-
Story Brief: If the story is less then two paragraphs and has an image or two you can choose to place all of the content in this area. If your story is longer or has lots of pictures, we recommend placing the first few sentences or the first paragraph of the story in the Story Brief area with an image or two, and add the rest of the content in the next section called Story Content.
-
Story Content: This optional section is used to display the rest of the story's content if the story was large. If this section has content, then a "Read More..." link will be displayed on the website at the bottom of the story. If a person clicks on the link it takes them to a page which has the story brief and story content displayed. On the bulletin, this section will be displayed under the content of the story brief.
-
-
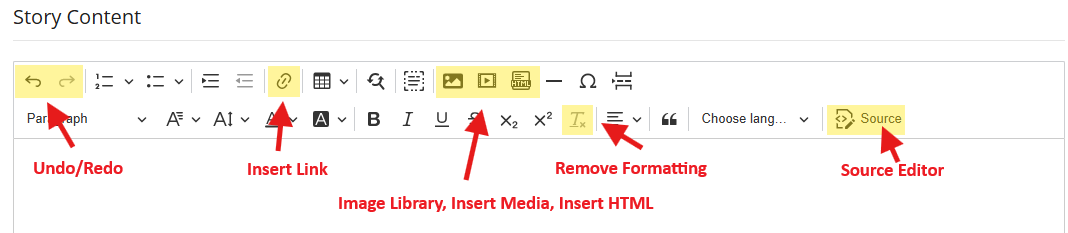
The Online Editor tool bar is used for story creation and editing. The toolbar appears at the top of both the Story Brief and Story Content, and contains a collection of shortcuts to help you with the common tasks of editing a story.
Here are some of the commonly used buttons in the toolbar:
-
Undo/Redo: Use these to undo or redo recent changes made in the editor session.
-
Add a Link: Link externally to another website or link internally to the many elements found in ClubRunner (another story, an event, a photo gallery, etc). You may find more information in the support article: How do I add a link?
-
Image Library: This accesses the ClubRunner Image Library, where you can upload images or insert images that have already been uploaded for your club.
-
Insert Media: This button allows you to embed all sorts of media, like YouTube videos.
-
Insert HTML: This allows you to insert HTML code into the editor, which can be helpful for embedding content such as fillable forms.
-
Remove Formatting: Remove all formatting and images from selected content.
-
Source: Click this button to reveal or hide the HTML/source code behind the page and make direct changes to its HTML content.
-
-
In the Blog section at the bottom of the page, you can enter tags in the story so it can be searched easier. Type into the field to add a new tag, or click on one of the existing tags to add it to the story. After you type in a new tag, press enter on your keyboard or click on the tag name above the entry field to add it to the list. You may add as many tags as you wish.

-
Once you are done, there are a few options located at the bottom right of the page.

-
Save and Publish - This will save and publish the story and take you to step 8.
-
Save Changes as Draft - This will save the story as a draft so you would be able to complete it later. The story will not appear on the website or bulletin until it gets published. The draft of the story can be found in the Drafts tab in the Story Library.
-
Cancel - This will exit out the story without saving it.
-
-
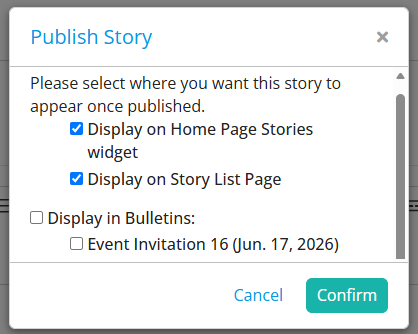
After you click Save and Publish, a box will appear asking where you would like the story to be displayed. Toggle the available checkboxes as necessary, then click Confirm to save the choices.
-
Display on Home Pages Stories widget - This will place the story at the top of your stories widget on your home page. Please note that the Home Page Stories widget will need to be placed in the home page for the story to display.
-
Display on Story List Page - This will place the story at the top of the Stories built-in page.
-
Display in Bulletins - You can choose which active bulletin you would like this story to be displayed in. Please note that the Bulletin Stories widget will need to be placed in the bulletin for the story to display.
-