
Cloud Events created within ClubRunner can be displayed on the website, sent by email, and shared on social media. Both members and non-members can register for events depending on the settings applied.
This article will show you how to update the finance and registration settings for a Cloud Event that has been created for your club.
For more options in setting up your Cloud Event, please see the support articles in the Related Content section in the top right-hand corner of this page.
-
To begin, log in to your account through your club homepage, then click on Member Area on the top right under your club banner. Alternatively, click here to go directly to the ClubRunner login page.
-
Click the arrow next to Events in the left-hand menu navigation, then click Cloud Events.
-
Click the Manage button on the event you wish to edit.
-
Click Setup in the top right-hand corner.

-
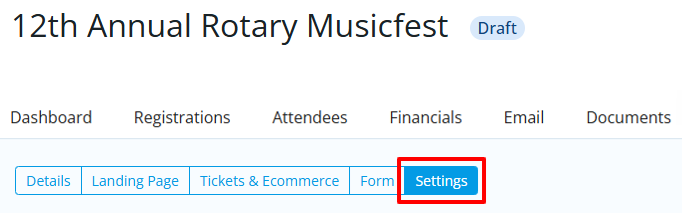
Click the Settings tab.
-
Click Edit in each section to adjust the settings as needed. The following settings are available to control various options for the event:
-
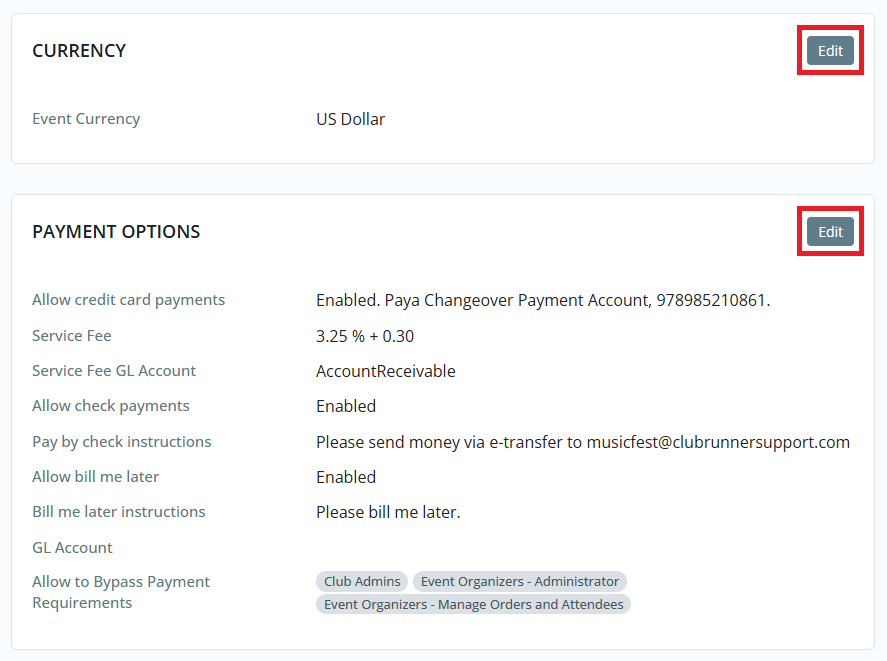
Event Currency - What currency the event uses for registrations.
-
Payment Options - Select which payment methods should be used when registering for the event.
-
Allow credit card payments - Allows you to enable or disable credit card payments for the event. You can also select other credit card processor accounts if you have more than one.
-
Add Service Fee to all registrations - A service fee allows you to help offset the cost of the transaction from the payment processor via a percentage cost or a flat fee. These fees are applied to the total order value when paying online during checkout.
-
Allow check payments - Allows you to enable or disable check payments for the event. If enabled, you may provide instructions for how the registrants can submit their payment.
-
Allow bill me later - Allows you to enable or disable an option for the registrant to pay at a later date for the event.
-
GL Account - A drop down that allows you to select which GL Account receives the event funds.
- Allow to bypass payment - Displays which account access levels are able to register for the event without submitting payment.
-
-
Invoice Settings - Adjust settings for event invoices.
-
Invoice Date: This is preset to the event registration date.
- Due Date: You set when the payment due date is for the event invoice, either a number of days/weeks/months from the event, or a fixed date.
-
-
Public Registration Settings - Adjust registration settings for people who are not club members.
-
Allow attendees to edit registration - Allows attendees to edit their registration details and questions.
-
Allow members to view attendees list - Allows members to view the list of attendees.
- Show number of attendees - Allows visitors to see the number of attendees on the public event page.
-
-
Administrator Registration Options - Adjust settings for events registered by an administrator.
-
Send all email notifications when the administrator registers someone on their behalf - This will enable email notifications to the attendee, buyer, and event organizer.
-
Send invoice to the buyer when the administrator registers them on their behalf - Sends a copy of the invoice to the buyer if administrator registered them on their behalf
-
-
Email Notification Templates - Displays the notifications and email templates which are sent to registrants, attendees, and the event organizer. The email templates which are used can be changed by clicking the Edit button. To view or manage the email templates, click the Manage Email Templates button.
You can learn more about customizing notification templates by reading: How do I customize email notifications for a Cloud Event?
-
Event Reminder - Allows you to create multiple scheduled email reminders to the event registrants and/or orders based on a customized campaign schedule. These can be created by clicking the Add button.
-
Success Message - A message that appears after the registrant successfully completes their purchase. This can be edited by clicking on the Edit button.
-
-
If you have other changes to make to this Cloud Event, please see the articles linked at the top of this page.