Cloud Events created within ClubRunner can be displayed on the website, sent by email, and shared on social media. Both members and non-members can register for events depending on the settings applied.
This article will show you how to edit the details and landing page for a Cloud Event that has been created for your club.
For more options in setting up your Cloud Event, please see the support articles in the Related Content section in the top right-hand corner of this page.
-
To begin, log in to your account through your club homepage, then click on Member Area on the top right under your club banner. Alternatively, click here to go directly to the ClubRunner login page.
-
Click the arrow next to Events in the left-hand menu navigation, then click Cloud Events.
-
Click the Manage button on the event you wish to edit.
-
Click Setup in the top right-hand corner.

-
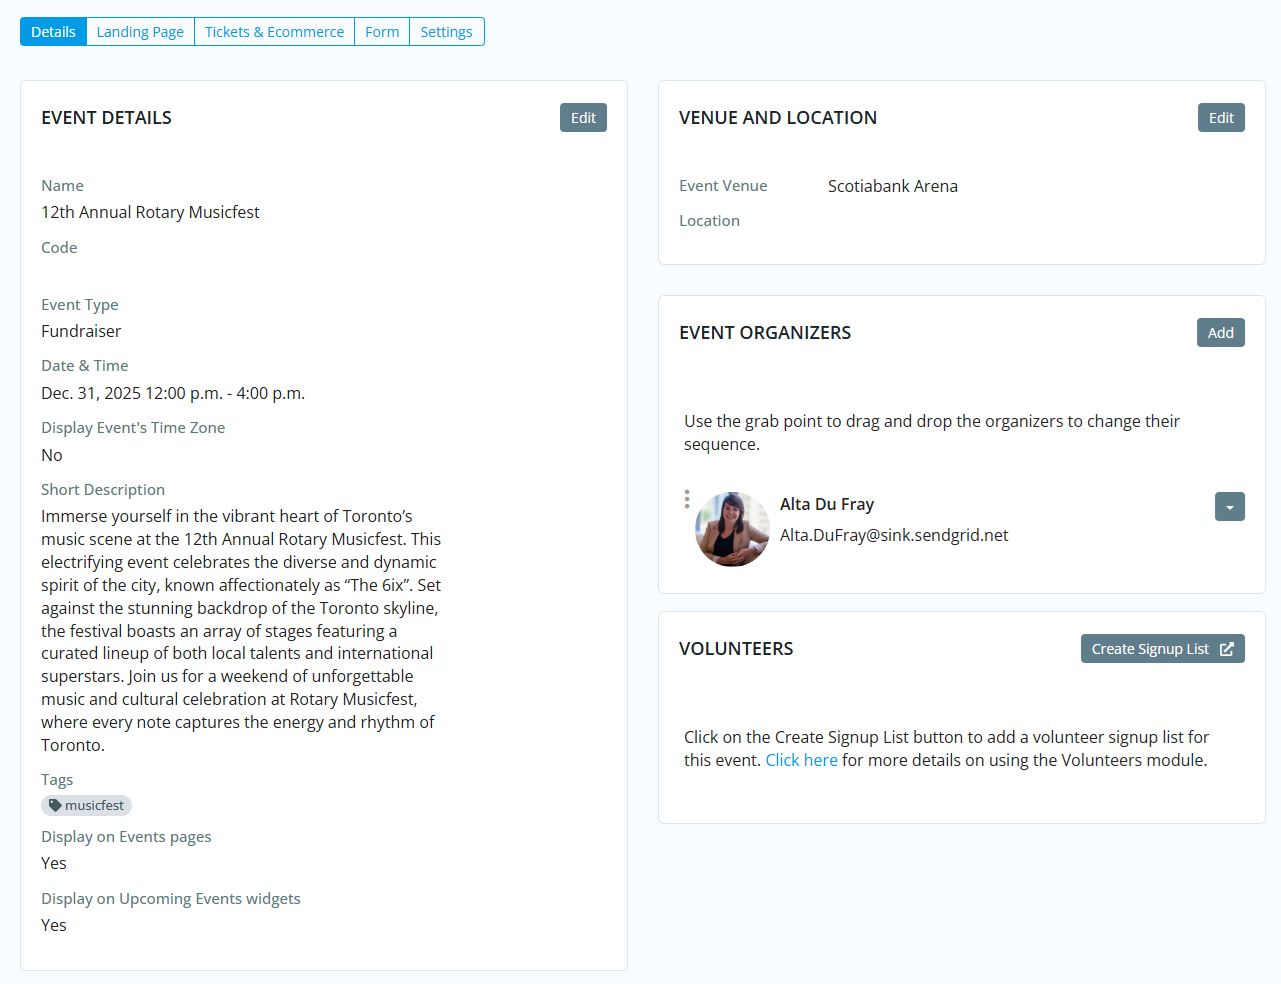
You are now on the Details page. Some of the fields will have been set when the event was first created. Click the action buttons such as Edit in each section to make changes. You have the following options to edit:

-
Event Details
-
Name - The name of the event (what will be seen on the club website).
-
Code - This helps the club track the finances within the club's credit card processor's reports.
- Event Type - The category that best fits the event and helps organize and visually differentiate events.
-
Starts On - The date and time the event starts.
-
Ends On - The date and time the event ends. The event duration may not exceed 365 days.
-
Time Zone - The time zone the event is in. Please note that when a user views the event’s page and hovers over the event’s time zone, help text displays and shows the event’s start and end times in their own time zone. This makes it easier for the user to know what time the event starts and ends.
-
Display Event's Time Zone - Always show the event time zone when the event is viewed.
-
Short Description - A short description of the event. This is displayed on the event and is used in the body of the ICS file which the attendee can download and save into their personal calendar.
- Tags - For use in the members area to help members search for a certain type of event.
-
Display on Events pages - When enabled, allows this event to be displayed on events: listing, grid, and calendar views. It is also displayed in the ClubRunner mobile app.
-
Display on Upcoming Events widgets - When enabled, allows this event to show on upcoming events widgets on the website and in bulletins.
-
- Venue and Location
-
Event Venue - The name of the event venue. This is displayed on the event and is used on the location line in the ICS file which the attendee can download and save into their personal calendar.
-
Event Address - The address of the event. You'll be able to select an address from the Google Maps autofill as you type, which will load up the map display.
-
-
Event Organizers
-
Organizer Details - The name of the person or people that are organizing the event. Their name will be displayed on the event details page. When adding event organizers you have the ability to set their role as well as which event email notifications they receive.
-
Organizer Role - This determines the level of access an event organizer has regardless of their account access level.
-
-
Volunteers - Create a signup list to track tasks and volunteers.
-
Event Image - An image used for the event in the club's members area and the event's description.
-
-
Once you have made the necessary changes in the Details page, click the Landing Page tab.

-
On this page you can set up the landing page where visitors will learn about the event and be able to submit their registration. Click the action buttons such as Edit in each section to make changes. You have the following options to edit:

-
Full Description - The description of the event that will display on the landing page.
-
Cover Image - An image used as a banner on the event's landing page on the website. The cover image should be at least 1920px by 1080px, and no larger than 15.00 MB.
-
Links & Attachments - Add links to external pages or attach files that will appear on the right-hand side of the landing page and provide additional information for visitors.
-
Landing Page Link
-
Permalink - This is used for the event's URL web address.
-
Public Event Page URL - Use this for when you want to use a different landing page than the one configured in Cloud Events. Enter a web address to redirect visitors to when they click on the event from a link on your club site.
-
Third Party Registration URL - Use this if you are using a third-party registration application for the event. Enter a web address to redirect visitors to when they click the Register button.
-
Register Button Text - The text that will display on the button visitors click to register for the event.
-
-
Social - Update settings for enabling comments and the social sharing bar on the event page.
-
-
If you have other changes to make to this Cloud Event, please see the articles linked at the top of this page.
